Flushing your water heater is the single highest-value maintenance task most homeowners never do. Minerals from your water supply settle at the bottom of the tank year after year, and that sediment layer is behind most popping and rumbling noises, slow heating, rusty water, and early tank failure. The good news: flushing takes under an hour, needs nothing more than a garden hose, and works on both gas and electric tanks. Here’s the complete, safe, step-by-step process.
Why Flushing Matters
Minerals in your water — mainly calcium and magnesium, especially in hard water homes — settle at the bottom of the tank as sediment. That layer sits directly between the burner (or lower heating element) and the water, and it causes a chain of problems:
- Wasted energy. Sediment insulates the water from the heat source, so the unit runs longer to hit temperature. The U.S. Department of Energy notes that regular sediment removal is a key step in keeping a water heater running efficiently.
- Popping and rumbling noises. Water trapped under the sediment boils and bubbles up through it — the classic noisy water heater.
- Shorter tank life. Trapped heat stresses the steel and accelerates corrosion — a leading path to a leaking tank.
- Less hot water, slower recovery. Sediment eats usable tank capacity and slows heating performance.
- Discolored or smelly water. Stirred-up sediment can make hot water look dirty or rusty.
Tools You’ll Need
- Garden hose (6–15 ft) — the only essential tool
- Flathead screwdriver or wrench — some drain valves need one to open
- Gloves and safety glasses — the water can be scalding
- Bucket and old towel — for drips when disconnecting the hose
Total cost if you own nothing on this list: about $15–$25. That’s the entire investment for a job that protects a $1,200+ appliance.
Safety First
- Let the water cool. Tank water sits at 120–140°F — hot enough to scald. Either turn the heater off 1–2 hours before flushing, or run a long hot shower first to use up the hottest water.
- Cut the heat source before draining. Heating an emptying tank can “dry fire” and destroy electric elements, and stresses gas burners.
- Route the hose somewhere safe. Sediment water can stain concrete and kill grass — a floor drain, gravel area, or driveway edge works best.
- Never force a stuck valve. Old plastic drain valves become brittle; snapping one off an open tank creates a flood you can’t stop.
The 10-Step Flush (Gas & Electric)
Step 1: Turn Off the Heat Source
Electric: switch off the water heater’s breaker in your panel. Gas: turn the control dial to “Pilot” (this keeps the pilot lit but stops the burner), or shut the gas valve entirely.
Step 2: Shut Off the Cold-Water Supply
Find the cold-water valve on the pipe entering the top of the tank and turn it clockwise until it stops. This prevents the tank from refilling while you drain.
Step 3: Open a Hot Tap in the House
Open a hot-water faucet at a nearby sink and leave it open. This breaks the vacuum in the lines so the tank drains smoothly instead of glugging.
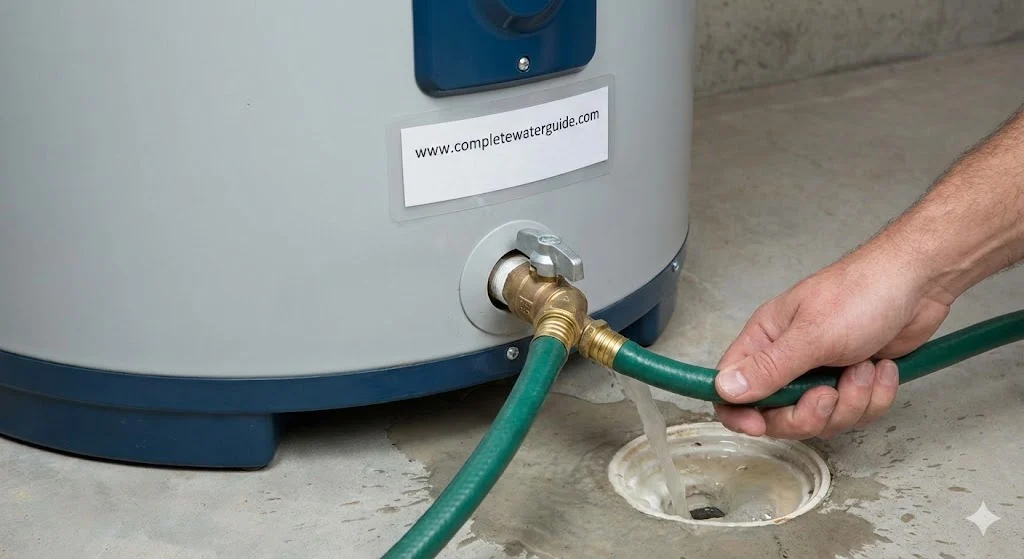
Step 4: Connect the Garden Hose
Thread the hose onto the drain valve near the bottom of the tank (it looks like an outdoor spigot). Run the other end to a floor drain or outside, keeping it below the valve level so gravity does the work.
Step 5: Open the Drain Valve
Open the valve with your hand or a flathead screwdriver. Water will flow out — expect it to look cloudy, sandy, or brown at first. That’s the sediment you’re here to remove.
Step 6: Let the Tank Drain
A 40–50 gallon tank takes roughly 15–30 minutes to empty depending on hose size and sediment. If flow slows to a trickle early, sediment may be clogging the valve — see the troubleshooting section below.
Step 7: Flush With Short Cold-Water Bursts
With the drain still open, turn the cold-water supply on for 20–30 seconds at a time, then off. Each burst stirs the remaining sediment off the tank floor and pushes it out the hose. Repeat until the water leaving the hose runs completely clear — this is the step that separates a real flush from a partial one.
Step 8: Close Up
Close the drain valve firmly, then disconnect the hose (a little hot water will drip — that’s what the towel is for).
Step 9: Refill the Tank Completely
Open the cold-water supply fully. Keep that hot tap from Step 3 open: it will sputter air, then run steadily. When it runs full and smooth, the tank is full — close the tap.
Step 10: Restore Power or Gas
Only after the tank is completely full, flip the breaker back on or turn the gas dial from Pilot back to your normal setting (re-light the pilot if it went out). Hot water returns in 30–60 minutes. Turning an electric heater on with a partly filled tank burns out the elements — this is the most expensive mistake in the whole job.
How Often Should You Flush?
| Your Water | Flush Frequency |
|---|---|
| Hard water (well water, high minerals) | Every 6 months |
| Moderate hardness (most city water) | Once a year |
| Soft water or softener installed | Every 18–24 months |
Not sure how hard your water is? A cheap test strip will tell you — see our guide to testing water quality at home. If it’s very hard, a water softener slows sediment at the source and stretches the interval.
Signs Your Tank Needs a Flush Now
- Popping, rumbling, or crackling sounds while heating
- Hot water takes noticeably longer to arrive or runs out faster
- Hot water looks cloudy, sandy, or slightly rusty
- Energy bills creeping up with no change in usage
- It’s been more than a year since the last flush (or you’ve never done one)
Problems After Flushing (and Fixes)
Drain valve is clogged and won’t flow
Heavy sediment can block the valve on tanks that haven’t been flushed in years. Try a few strong cold-water bursts (Step 7) to break it loose, or gently poke through the open valve with a straightened coat hanger. If it stays blocked, stop and call a pro — forcing it risks a valve break on a full tank.
Drain valve drips after closing
Sediment often lodges in the valve seat. Open and close the valve once or twice to clear it. If the drip continues, cap the valve with a garden-hose cap ($3) as a stopgap and have the valve replaced ($150–$250).
No hot water afterward
Usually one of three things: the breaker wasn’t turned back on, the pilot needs re-lighting, or (worst case) an electric element was dry-fired because power was restored before the tank refilled. Check power and pilot first; if there’s still no hot water, an element may need replacement.
Low pressure at faucets
Stirred-up sediment can clog faucet aerators. Unscrew the aerators, rinse the grit out, and reattach.
DIY vs. Professional Cost (2026)
| Option | Typical Cost | Best For |
|---|---|---|
| DIY flush | Free (or $15–$25 for a hose) | Routine maintenance on a healthy tank |
| Professional flush | $100–$200 | Neglected tanks, clogged valves, or bundled with an inspection |
| Pro flush + anode rod check/replace | $250–$450 | Tanks 4+ years old — the best-value combo for extending tank life |
Rather have a pro handle it?
A professional flush includes a full inspection — anode rod, T&P valve, and connections — and safely clears tanks that haven’t been flushed in years. Get connected with a licensed water heater specialist near you, available across the U.S.
Connects you with an independent local service provider. Standard call rates may apply.
Frequently Asked Questions
How long does it take to flush a water heater?
Usually 30–60 minutes total — about 15–30 minutes of draining plus flushing bursts and refill time. Tanks with years of buildup can take longer because sediment slows the drain.
Do tankless water heaters need flushing?
Yes. Tankless units should be descaled every 12 months by circulating white vinegar or a descaling solution through the unit with a small pump kit. Scale on the heat exchanger reduces efficiency the same way tank sediment does.
Can flushing damage the heater?
Done correctly, no — flushing prevents damage. The two real risks are forcing a brittle drain valve and restoring power before the tank is full (which burns out electric elements). Follow the steps in order and both are avoided.
What if the drain valve is clogged?
Try short cold-water bursts to break the sediment loose, or gently clear the opening with a stiff wire. If it won’t flow, call a plumber rather than forcing it — a snapped valve on a full tank is a flood.
Should I flush an old tank that’s never been flushed?
Opinions differ, but the practical answer: if the tank is 10+ years old and has never been flushed, have a professional do it (or skip it and budget for replacement). Disturbing a decade of sediment can occasionally reveal leaks the buildup was masking.
Does flushing help with rotten-egg smell?
It helps, but the smell usually comes from the anode rod reacting with sulfates — see our guide on why water smells like rotten eggs. The full fix is a flush plus an aluminum/zinc anode rod swap.
Related Guides
- Water Heater Problems: Complete Troubleshooting Guide
- Why Is My Water Heater Making Noise?
- Why Does My Water Heater Produce Rusty Water?
- Why Your Water Heater Is Not Heating
- Is a Leaking Water Heater Dangerous?
The Bottom Line
An annual flush is the cheapest insurance a water heater can get: under an hour of work, a garden hose, and you head off the sediment behind most noise, efficiency loss, rusty water, and early tank failure. Cut the heat, drain until clear with cold-water bursts, refill completely before restoring power — and you’re done for the year. If your tank is old, neglected, or the valve won’t cooperate, call 877-750-4078 and let a licensed pro flush and inspect it in one visit.